Revisiting the D43 one-shot capture function
The Electrical Engineering StackExchange strikes again.
My Telequipment D43 projects - Table of Contents
As usual, I spent some time on the Electrical Engineering StackExchange this evening.
One of the questions was about debouncing a push button. To properly answer that question, I needed some images of contact bounce.
I already had some scope pictures of contact bounce from a previous blog post, but I didn’t have any of a debounced button.
I slapped together a simple debouncer from a couple of resistors and a capacitor, and had at it.
This is the debounced button press:
| Debounced button |
|---|
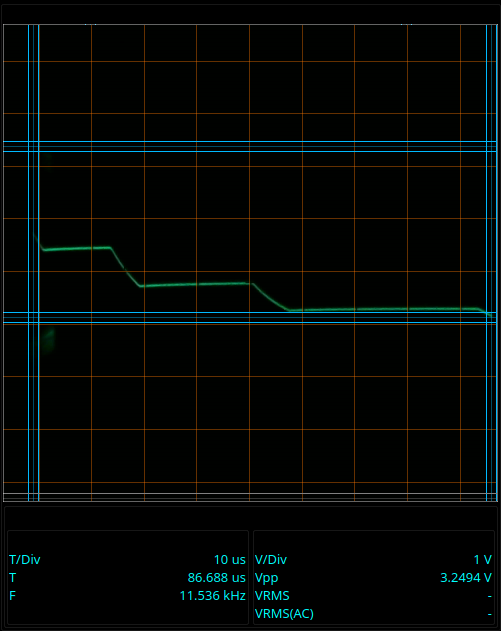 |
It isn’t perfect, but it beats the heck out of the original bouncing contacts:
| Bouncing button |
|---|
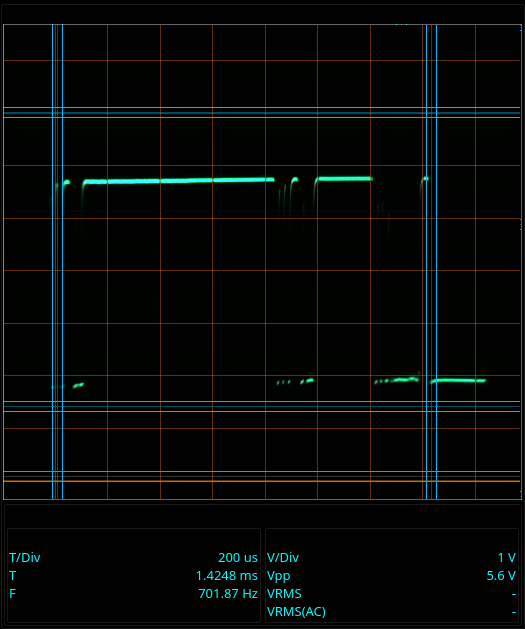 |
Using the one-shot reminded me that although I wrote about it when I implemented it, that post didn’t actually describe how it works. All I described in that post was how I overcame a bug in OpenCV while making the one-shot.
Some time in the past few weeks, there was some discussion about analog scopes and one-shot capturing on the Electrical Engineering StackExchange. That reminded me that I had never described how it works, and the question and answer today brought it up again.
OK, so how does the D43 camera one-shot work?
The software has absolutely no connection to the scope. All it has is the camera - and that is totally adequate.
Hardware wouldn’t do the job, and I don’t want to have any electrical connection between my PC and the scope anyway.
Hardware would require that something signal the computer, and then the software would have to go grab an image.
Anything cobbled together from commonly available parts won’t be able to get that signal to the software fast enough, and the software probably couldn’t react fast enough, anyway.
Nope, it is pure software.
The camera watches the CRT all the time anyway. There’s a little jigger in software that watches what I call the “digitizing area.” When the one-shot function is armed, that little jigger checks every image to see if there’s a green spot in every column of the digitizing area. If more than 90 percent of the image columns in that area have a green spot, then it triggers the “Pause” function (the same function behind the “Pause” button.)
The “digitizing area” is the range that the original grid on the CRT covers. The left most edge of the grid is T=0. The right most edge of the grid is the end of the sweep (more or less.)
When the digitized view is in use, only the trace in that range is digitized. Similarly, only that range counts for detecting a one-shot event.
To use it, you adjust the scope so that it triggers on your signal. Black, blank screen until the signal triggers a sweep, then a full trace when it is triggered.
Once the trigger adjustment is stable, you turn on the one-shot function in the software and send your signal again - Bam! Picture made.
From the pause mode you can either reset the one-shot or save the image - or both, naturally.
The one-shot captures in whatever mode you were using - you can’t switch a captured one-shot from analog to digitized (or combined.) That’s the same as the regular “Pause” function. What’s captured is captured, and you can’t change it.
This is the total code needed to recognize a one-shot sweep:
    green = self.ScopeImage[:, :, 1]
    trigger = np.max(green, axis=0)
    if len(trigger[np.where(trigger > 20)]) > abs(self.range_X1- self.range_X2)*0.9:
        self.triggered =  True
    else:
        self.triggered = False
Line-by-line:
- Get only the green channel from the current image
green = self.ScopeImage[:, :, 1] - Find the intensity of the brightest spot in each column of the green image
trigger = np.max(green, axis=0) - Count how many columns in the green image are above a minimum brightness. If the count is greater than 90 percent of the width of the digitizer, then set the trigger, else reset the trigger.
 if len(trigger[np.where(trigger > 20)]) > abs(self.range_X1- self.range_X2)*0.9:
     self.triggered =  True
 else:
     self.triggered = False
After “triggered” is set (or reset) the program looks at it and either hits pause or keeps running.
Simple, stupid, robust.
It works reliably, and always makes its shot. There’s less code in there than would have been involved in reading some hardware signal, and the hardware signal would be too slow, anyways.
There you have it - the complete function behind the D43 camera software one-shot capture.
What simple, stupid algorithm have you implemented that does its job perfectly and consistently where a more complex solution would fail?