Improving the blog
Making my posts more visible on search.
I keep an eye on the “Google Seach Console” to see how people find my site. What search terms they use, how far down the list of results people go to get to my posts, etc.
One thing I’ve found is that there’s a heck of a lot of people who search for information on voltage multipliers who end up on my blog. Ya’ll need to find something better to do with your time.
I also try out some of the search terms in Google just to see what my pages look like in the results.
What I’ve found there is that most of the entries don’t have an image associated with them, even if the blog post is full of pictures. Even when there is a picture associated with the blog post, it seems that Google picks one at random from the page.
I decided I’d like to change that. A bit of searching showed that there’s a way to specify which image the search engines should prefer to display in the results.
I figured while I was at it I’d add some images to the main page of the blog, and add a logo to all of my pages.
I wanted to add the logo because almost no one ever goes from a blog post to the main page. I have this weird feeling that people don’t realize that the page title is also a link to the rest of the blog. Folks tend to click on logos, though, so I wanted to add an image with a link next to the page titles.
I did the logo first, then the front page preview images. When I got that done, I found I had to go back and redo the preview images because there was a way to tie them into the search engine preference thing.
I use the Minima theme for my blog, and I’d rather stay with it than change to something new. I like the clean, simple, almost book like layout. I just want to improve what Google (and other search engines) show in their results, and add a little bit of color to the main page.
All of the tips below are based on the Minima theme, though I expect most of it can easily be used in other themes. The names of the files might be different, but the concepts should be the same.
Adding a logo to all the pages
Adding a logo required extending the ‘main.scss’ and setting a variable in the _config.yml file.
I could have just hardcoded it and been done with it, but I was learning about Jekyll and Liquid and just went on and figured out how to implement a site variable.
To add a logo to the page title, all you need to do is this:
- Make a ‘main.scss’ file in the assets folder of your site.
- Add the following lines to the ‘main.scss’ file:
---
# Only the main Sass file needs front matter (the dashes are enough)
---

@import "minima";

.site-title::before {
content: url(/assets/favicon.png);
display: inline-block;
position: relative;
width: 32px;
top: 8px;

}
- Add the following to your site’s ‘_config.yml’ file:
site_logo: "/assets/favicon.png"
Set the “site_logo” to some image stored on your site, and it’ll show up to the left of the page title on all pages. It’ll also be a clickable link to your main page.
Make your image small. I set the width to 32 pixels. You don’t really have that much room in the header, so a small image is needed. Make your logo 32 pixels by 32 pixels, and it should fit just right with the settings I used in the main.scss.
Tell the search machines what image to use
This is easy if you use the Jekyll SEO tag plugin and an absolute pain if you don’t. Make your life easier and use the plugin.
The SEO plugin has installation instructions.
Here they are:
- Add the following to your site’s
Gemfile:gem 'jekyll-seo-tag'
- Add the following to your site’s
_config.yml:plugins: - jekyll-seo-tagIf you are using a Jekyll version less than
3.5.0, use thegemskey instead ofplugins.
- Add the following right before
</head>in your site’s template(s):{% seo %}
Make sure to set the ‘author’ and ‘logo’ variables in your ‘_config.yml’ file:
author: Joseph R. Eoff
logo: "/assets/favicon.png"
That ‘logo’ is separate from the ‘site_logo’ setting. This ‘logo’ setting just tells the search engines what logo to use for your site - it won’t be displayed on your site. You have to set it (and ‘author’) so that all the needed fields are filled in the json-ld that is added to each page - especially the ‘publisher’ block. If the publisher isn’t set, then Google won’t like it and might not use the data.
If you’re using the Minima theme, then you can leave out step 3 because the Minima templates already have the needed tags.
Now to tell Google and all the other search engines what image to associate with each post, you just add an “image” setting to the front matter of each post.
Like this:
---
layout: post
title: "Improving the blog"
categories: [blog]
mathjax: false
image: /assets/some_cool_image.jpg
---
Yes, I do have MathJax enabled on my site, but not on all pages.
The SEO plugin does the rest. It already adds meta data based on particular fields of your blog posts. The “image” setting tells it which image to add to that metadata.
Add a preview to the front page
The Minima theme front page is a simple list of your blog posts with the date, the title, and an excerpt (if you have excerpts turned on.)
That’s fine for me, but I keep reading that people tend to click on things more often if there’s a picture along with the link. It turned out to be pretty easy to add an image to the list of posts.
- Add a ‘_layouts’ folder to your site.
- Add a ‘home.html’ file to the ‘_layouts’ folder.
- Insert the following text in the ‘home.html’ file:
---
layout: default
---

<div class="home">
  {%- if page.title -%}
    <h1 class="page-heading">{{ page.title }}</h1>
  {%- endif -%}

  {{ content }}

  {%- if site.posts.size > 0 -%}
    <h2 class="post-list-heading">{{ page.list_title | default: "Posts" }}</h2>
    <ul class="post-list">
      {%- for post in site.posts -%}
      <li>
        {%- assign date_format = site.minima.date_format | default: "%b %-d, %Y" -%}
        <span class="post-meta">{{ post.date | date: date_format }}</span>
        <h3>
          <a class="post-link" href="{{ post.url | relative_url }}">
            {{ post.title | escape }}
          </a>
        </h3>
        {%- if site.show_excerpts -%}
          {{ post.excerpt }}
        {%- endif -%}
        {%- if post.image -%}
          <a class="post-preview" href="{{ post.url | relative_url }}">
                <img alt="{{ post.title }}" src="{{ post.image }}">
          </a>
        {%- endif -%}
      </li>
      {%- endfor -%}
    </ul>

    <p class="rss-subscribe">subscribe <a href="{{ "/feed.xml" | relative_url }}">via RSS</a></p>
  {%- endif -%}

</div>
That’s the standard Minima ‘home.html’ with a few extra lines added.
Here’s the magic bit:
{%- if post.image -%}
          <a class="post-preview" href="{{ post.url | relative_url }}">
                <img alt="{{ post.title }}" src="{{ post.image }}">
          </a>
{%- endif -%}
That adds a clickable image to the block containing each post on the main page of the Minima theme. It uses the image you set for the search image to make the previewable button.
One last bit, and then it will all work.
That last snippet refers to a CSS-class that doesn’t normally exist. You need to add it to your site’s ‘assets/main.scss’ file - that’s the first one created up there under “Adding a logo to all the pages.”
Add the following lines to ‘assets/main.scss’:
.post-preview {
display: inline-block;
position: relative;
max-width: 100px;
max-height: 100px;
top: 0px;

}
That formats your image to a 100x100 pixel box and puts it in the right place below the post title and excerpt on the front page.
With that done and a few ‘image’ values set, my front page looks like this:
| Front page with previews |
|---|
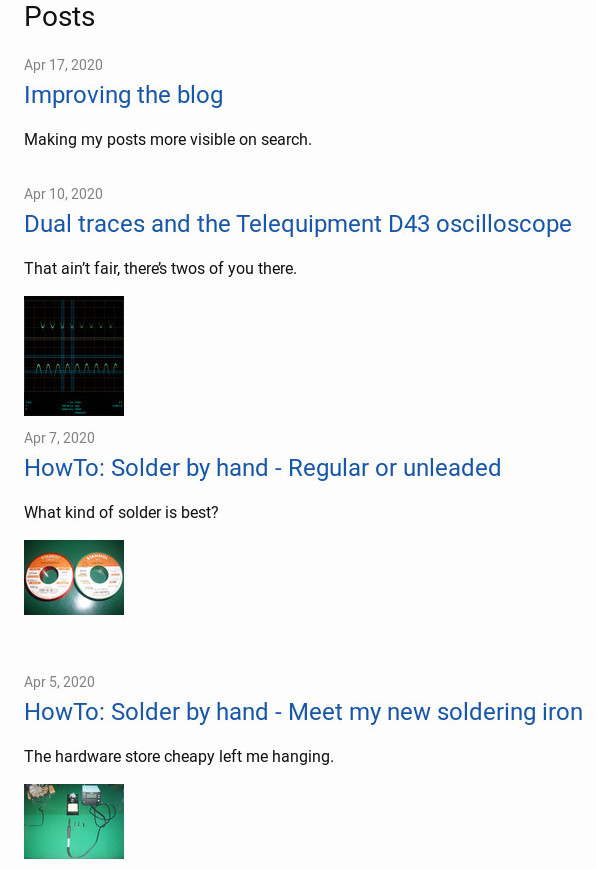 |
Previews on the front page, metadata for the search machines, and a clickable logo on top of it all. What’s not to like?
I’ll be adding ‘image’ tags to my existing blog posts in the next few days. This one included, I’ve got 60 of the flipping things. It’ll take a while to go through and update them all.
In the mean time, let me know if you think the images on the front page are a good thing or not. Leave a comment below, or click on one of the Disqus “reaction” buttons.