A persistence control for the D43 oscilloscope camera software
Making use of long sweep times.
My Telequipment D43 projects - Table of Contents
| A very long sweep time |
|---|
 |
I wrote a post a couple of days ago about my idea to use a voltage multiplier to drive an electrostatic speaker.
While writing that, I made a couple of pictures of some very slow signals. Like, 10Hz sine wave slow signals. That didn’t work very well. I had to use a very slow sweep time on my oscilloscope. If you’ve ever used a simple oscilloscope with a sweep slower than about 20 milliseconds per division, then you know that it flickers quite badly. The pictures I made with my D43 oscillscope camera software were jagged and missing large areas of the traces where the camera wasn’t synchronized with the sweep.
I finished that post with the crummy images. The next day, I set about adding a persistence mode to the D43 software.
This post is about how I made the persistence mode. I’ll also show a couple of pictures of the results.
I’ve intended to add a persistence mode to the D43 software since the very beginning, but hadn’t really needed it until a couple of days ago. Part of the reason I hadn’t implemented it was because I hadn’t thought up a good way to do it.
Under the pressure of needing it now, I came up with a method that was very simple and very effective.
The simplest and most effective way to make a persistence mode was to simply analyze each image, and copy every column of pixels that has at least one pixel brighter than some threshold from the new image to a persistent image. I had thought up all kinds of schemes with transparency and synchronizing to the trace and just all kinds of complicated crap.
Simple is best, and this simple method works very well indeed.
The only real “magic” in it is setting the threshold. I didn’t want to have to fiddle with some control on the screen to make the persistence work properly. I wanted to be able to just turn it on and have it do a decent job.
This is the magic bit that selects the new columns and copies them to the persistent image:
threshold = np.amax(self.persistImage[:, :, 1]) * 0.8
bright = np.where(green.max(0) >= threshold)[0]
if bright.size>0:
    for x in np.nditer(bright):
        self.persistImage[:, x] = scopeImage[:, x]
That looks pretty impenetrable, but mostly because numpy is somewhat… inscrutable. At least, I find it that way. It’s powerful (which is why I use it) but I have to stop and really consider what each thing does and then double check the documentation. It can do a lot with just one command, and it does it fast. Overall it’s a big win for code length and code speed, but it does require a good bit of thought while using it.
Let’s break those few lines down and see what they do.
threshold = np.amax(self.persistImage[:, :, 1]) * 0.8
This sets the threshold for the minimum brightness that at least one pixel in a column has to be for the column to be copied into the persistence image. It takes the brightest pixel (np.amax) in the green channel ([:,:,1]) of the current copy of the persistent image (self.persistImage.) That’s multiplied by 0.8. The final effect is that the threshold is set at 0.8 times the value of the brightest green pixel in the current current persisted image.
bright = np.where(green.max(0) >= threshold)[0]
This is more numpy magic. The where function looks at the green image (sliced from the current new image in a previous step) and returns an array of the indexes of all columns where there is at least one pixel brighter than the threshold.
if bright.size>0:
An image might contain no columns that exceed the threshold. Normally, this is no problem in Python. A for loop on a list will just skip over an empty list. Unfortunately, this doesn’t work with numpy arrays. This check is used to skip the following loop if the array is empty (there are no columns to copy.)
for x in np.nditer(bright):
This uses a numpy function (nditer) to loop over the array of column indexes. The only interesting thing here is that nditer blows its top if the array is empty.
self.persistImage[:, x] = scopeImage[:, x]
The final bit of numpy magic. This copies all the pixels in a column from the current image to the persistant image. There’s probably a faster way to do this with numpy (leaving out the for loop,) but I got tired of looking up numpy functions. This is fast enough and gets the job done.
There was actually more code involved in turning the persistence mode on and off and in even just getting a button on the screen than there is in the actual function itself. That’s something that has always bugged me about programming. The actual task is often the easiest part of the problem - it’s the junk all around it that takes so much time to write. There’s probably a couple of dozen lines of code involved in putting the persistence checkbox in the GUI and handling its events, but there’s only a handful of lines that actually do the real work.
At any rate, it works and it works well.
This is an image of a sine wave with a period of 24 seconds (that’s 42 millihertz) captured using the 5 second per division sweep of my D43:
| Sine wave 42mHz |
|---|
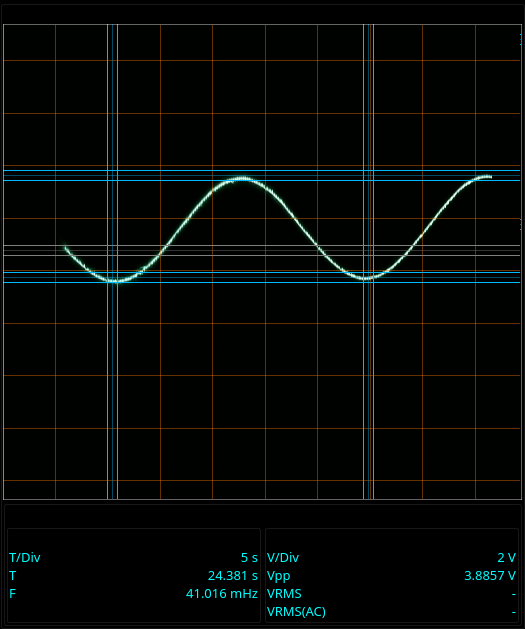 |
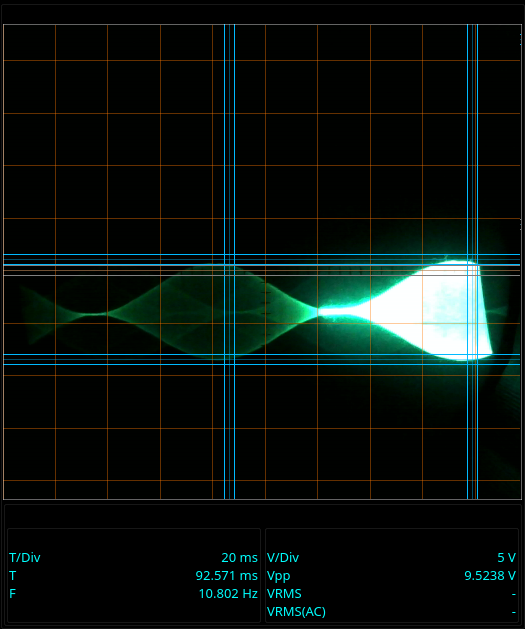
These images are what actually caused me to need the persistence mode:
| Amplitude modulator - 16kHz carrier 10Hz modulation |
|---|
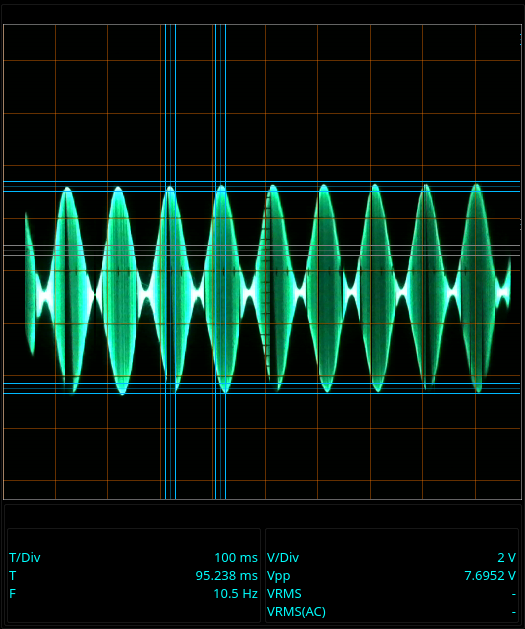 |
 |
Note the time per division. That’s 100 milliseconds per division. At that speed, the display just flickers. The original images I made only showed a section a few divisions wide because that happened to be the part that was “lit up” when the snapshot was made. Those two were made using persistence mode.
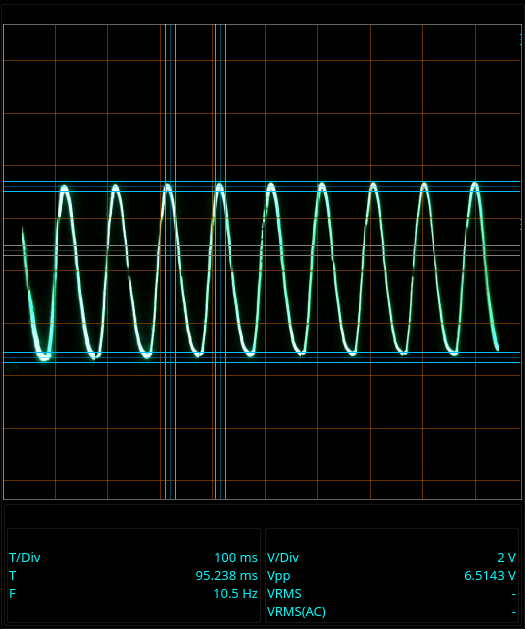
That’s a heck of a difference to the original images I used in the last post:
| Amplitude modulator - 16kHz carrier 10Hz modulation - no persistence |
|---|
 |
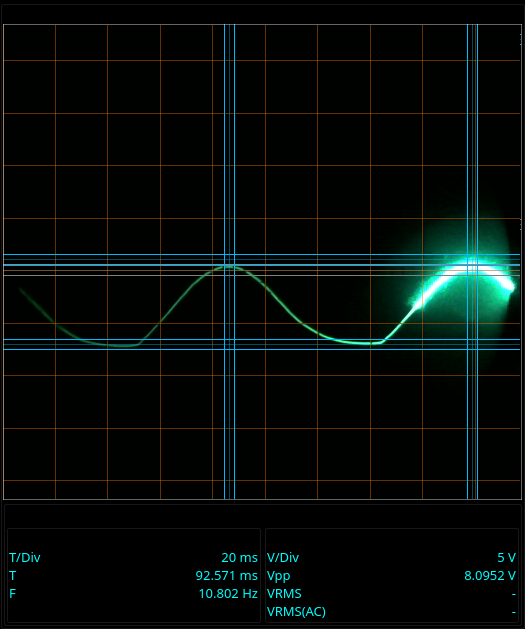 |
Those two were made at 20 milliseconds per division because anything slower was completely unusable without the persistence mode.
There’s still some tearing in the image of the modulated signal using the persistence mode, but that’s down to the camera not being able to record it. Not much I can do with clever software to replace things the camera doesn’t even pick up.
I find it fascinating to watch a really slow sweep in progress. Here’s a video of that 42 mHz signal refreshing. That’s at 5 seconds per division.
Slow sweep video:
(Click the video to start playback.)
I figure the slow sweep speeds were used only with a camera and a long shutter exposure time back in the day. You certainly can’t tell anything about a signal by eye at 5 seconds per division.
The D43 oscilloscope camera software lets you look at that kind of thing live. Not only that, I rigged the whole thing so that you can use the digitized view on the persisted image as well as storing the digitized measurements made using persistence.
This is a spectrum analysis made using digitized data from using the persistence mode:
| Spectrum |
|---|
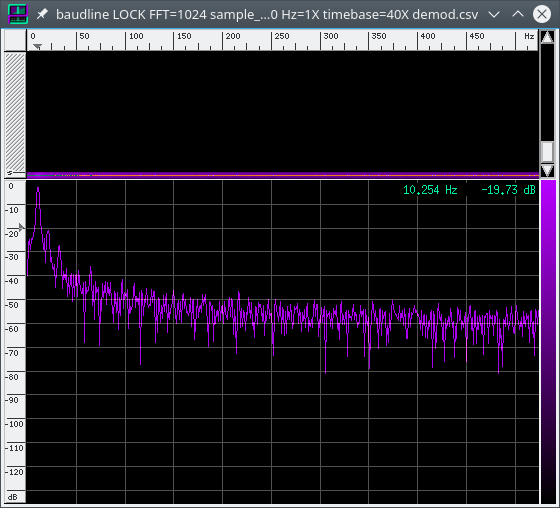 |
That’s the demodulated 10Hz signal from above. I used the persistence mode to capture and digitize it with the D43. The D43 software exports a CSV file that I imported in to Baudline to show the spectrum. There’s a peak there at 10 Hz.
There you have it: persistence mode for viewing really slow signals in real time on an old analog scope.
The 42mHz signal is an extreme example. It’s not something I really needed to do, it was just a test to see how far down the old D43 could go. Generating that sine wave was fun. I’ll tell you about it the next time I get a chance to write a blog post.
Have you ever had a use for slow sweep speeds on your analog oscilloscope? How did you manage it?