The Pfaff model K sewing machine - Secrets of the vibrating shuttle
The first rule of the vibrating shuttle oiler is that you don’t talk about the vibrating shuttle oiler.
Read all about my adventures with the Pfaff model K.
While rejuvenating this Pfaff model K, I discovered several little tidbits of information. Most of them will apply to all vibrating shuttle sewing machines - the Pfaff K and L models, the Singer 28K, and uncounted other vibrating shuttle machines.
I’m going to put this all in one long post with pictures. Some of this stuff probably deserves its own dedicated post, but I’m running out of time to play with the Pfaff K. It is due to be delivered to its new owner in just a couple of days, so I’m hammering this stuff out while I still have it here to make photos.
The vibrating shuttle oiler hole
This thing was a slight mystery to me when I found it. Its function seemed obvious, but yet it wasn’t mentioned in the Pfaff model K user’s guide or in the similar Singer 28K user’s guide. There are approximately five bazillion spots you have to oil according to the user’s guides, but none of them mention this one particular spot in the text. The pictures don’t show it, either.
| Vibrating shuttle oiler |
|---|
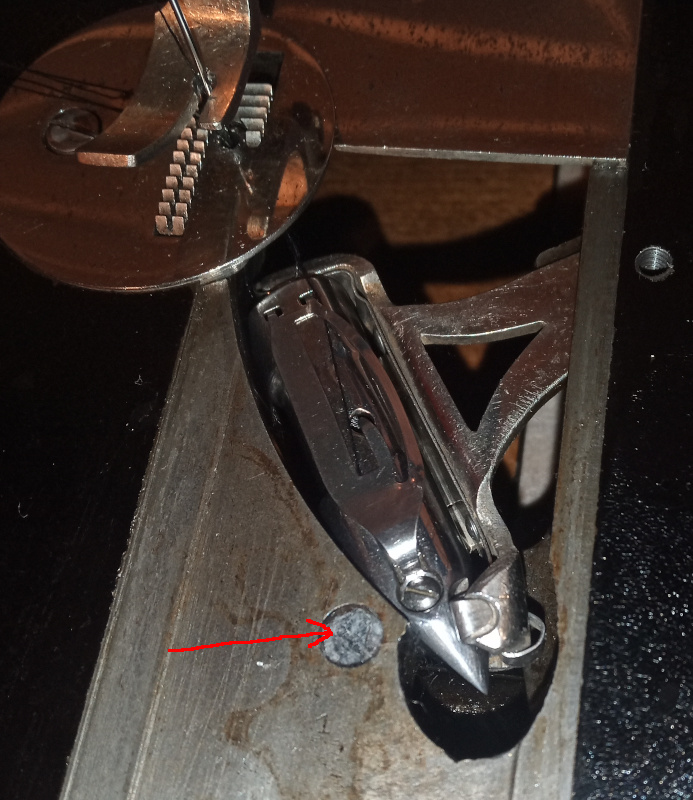 |
If you remove the sliding cover over the shuttle, you’ll find a hole close to the shuttle race near the hole you use to pop the shuttle out of the shuttle carrier. That hole is supposed to be filled with oil soaked felt. There’s a small hole at the bottom that connects to the shuttle race. Oil will weep out of the small hole from the felt and keep the shuttle and the shuttle race oiled.
If you hear a scratching sound coming from the shuttle race as you are sewing, then you need to put some more oil in the vibrating shuttle oiler.
If there’s no felt in the hole, you can use a cotton ball. If you happen to be cleaning up an old machine, you can dig out the oily fuzzy-wuzzies that collect under the feed dogs to fill the oiler hole. A final, slightly odd, alternative is to use the fuzz that collects in the filter sieve of a clothes dryer. That last one was suggested when I asked about the oiler on a German vintage sewing machine enthusiast forum.
Keep the oiler oiled. The shuttle will thank you, the sewing machine will thank you, and your ears will thank you.
Shuttle
You can’t just drop a new shuttle into a vibrating shuttle sewing machine and expect it to work properly.
If you manage to find a spare shuttle for your vibrating shuttle sewing machine, you’ll have to check it for fit and probably modify it slightly. The point of the shuttle is curved to fit the curve of the shuttle race. The curve of the race and the space between the race and the shuttle carrier varies slightly between machines. If you are lucky, your new shuttle will fit right in. More likely, it will be a tiny bit too thick so that you will have to grind it down a little for proper function.
| Shuttle spacing |
|---|
 |
You can tell if you need to modify your new shuttle by putting it in and sewing a few stitches (hand cranked) with the sliding cover open.
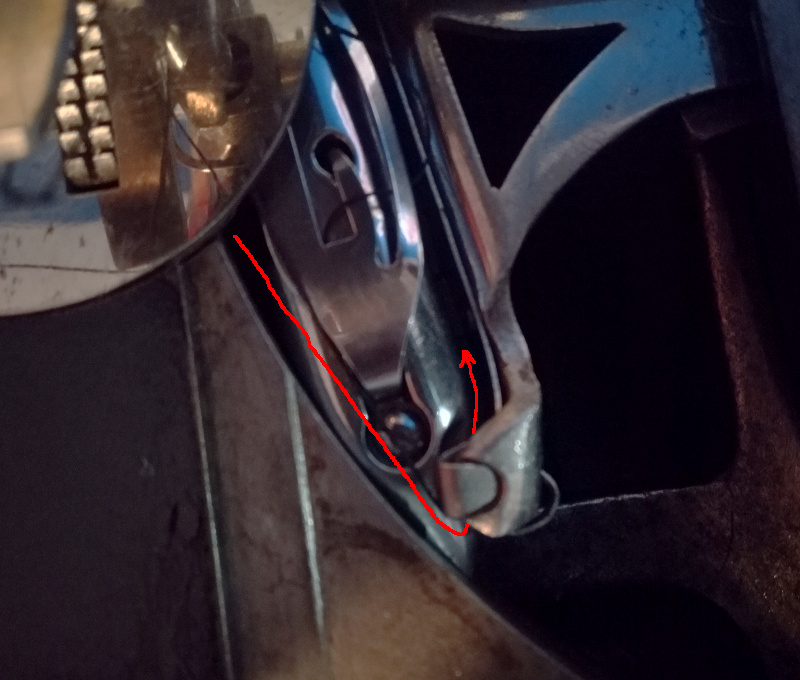
As you crank the machine, the upper thread will go over the point of the shuttle then follow the path marked in red around the shuttle. The thread has to pass between the shuttle and a spring on the shuttle carrier. If the shuttle is too large, then either the thread will hang on the spring or you will hear a slight “Bink!” as the thread is jerked under the spring.
| Thread path |
|---|
 |
 |
| Bink! |
If the thread hangs or “Binks” on the shuttle carrier spring, then you need to carefully grind the shuttle to better fit the shuttle race on your vibrating shuttle sewing machine.
| Grinding |
|---|
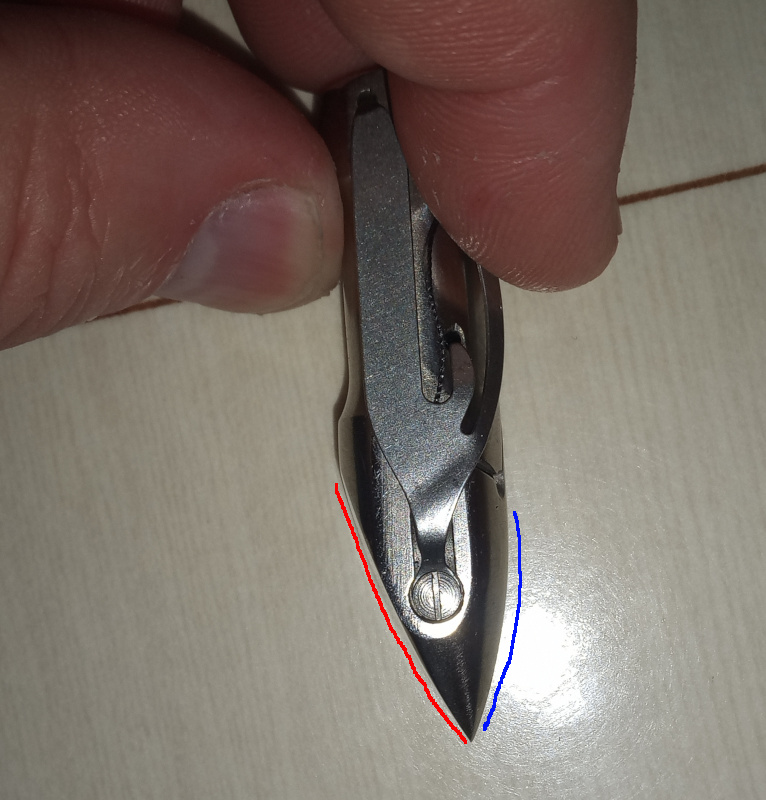 |
I used a cheap knife sharpening stone (two sides, coarse and fine,) a “hard Arkansas” natural sharpening stone, and a leather strop with jeweler’s rouge to fit the shuttle to the machine.
- Work the red marked side of the shuttle on the coarse side of the sharpening stone. You want to remove metal from the shuttle, but you also want to keep the curve. Ideally you’ll match the curve of the shuttle race.
- Wipe the shuttle clean so that you don’t get grit from the stone in the sewing machine.
- Sew a couple of stitches and listen for the “Bink!”
- Repeat until the thread can pass between the shuttle and the shuttle carrier spring without going “Bink!”
- Work the red side on the fine side of the sharpening stone to get rid of the deep scratches from the coarse side.
- Polish the red side with the “hard Arkansas” sharpening stone to get it really smooth.
- Polish the red side with some jeweler’s rouge on the leather strop to make it shiny smooth.
- Polish the blue marked side of the shuttle with the jeweler’s rouge and the leather strop so that the thread won’t drag on it.
I used a new Singer 28K shuttle with this Pfaff model K machine. I had to fit the shuttle to it as described. That’s not because it was a Singer shuttle in a Pfaff machine, but because all shuttles have to be “fine honed” to make them work right. There’s a German sewing machine technician’s book (Wilhelm Renters Der Nähmaschine Fachmann, if you can read German) that mentions it and that you have to do it for all new shuttles.
If you buy a used shuttle to use with your machine, you might find that it has been honed already and may be too loose when used in your machine. I can’t tell you what might happen then because I haven’t had a chance to try it out.
Presser feet
The Pfaff model K (and probably many other vibrating shuttle sewing machines) uses standard low shank presser feet. That’s good - you can buy them nearly every where.
The bad thing is that all presser feet aren’t all the same. The needle hole in the feet may be offset a little to the left or right of the needle. Maybe “offset from the side of the presser foot bar” would be a better way to describe it.
| Offsets |
|---|
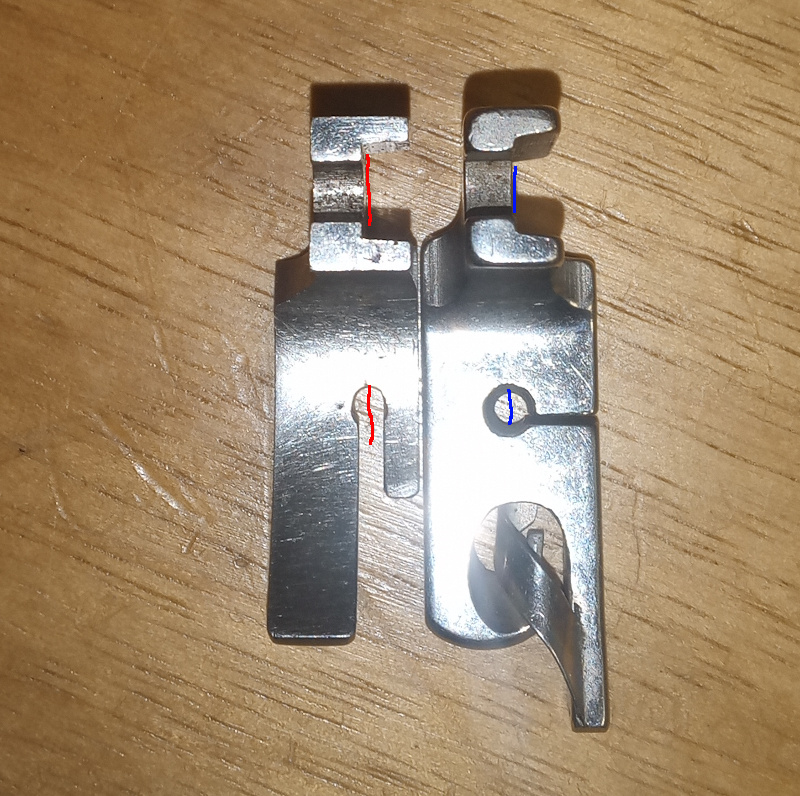 |
Regardless, you may well install a new (or used) presser foot and discover that the needle drags (or strikes) on the foot. You can adjust the presser foot left and right by loosening the screw marked in red then turning the foot a bit left or right until the hole is centered around the needle.
| Adjust the presser foot |
|---|
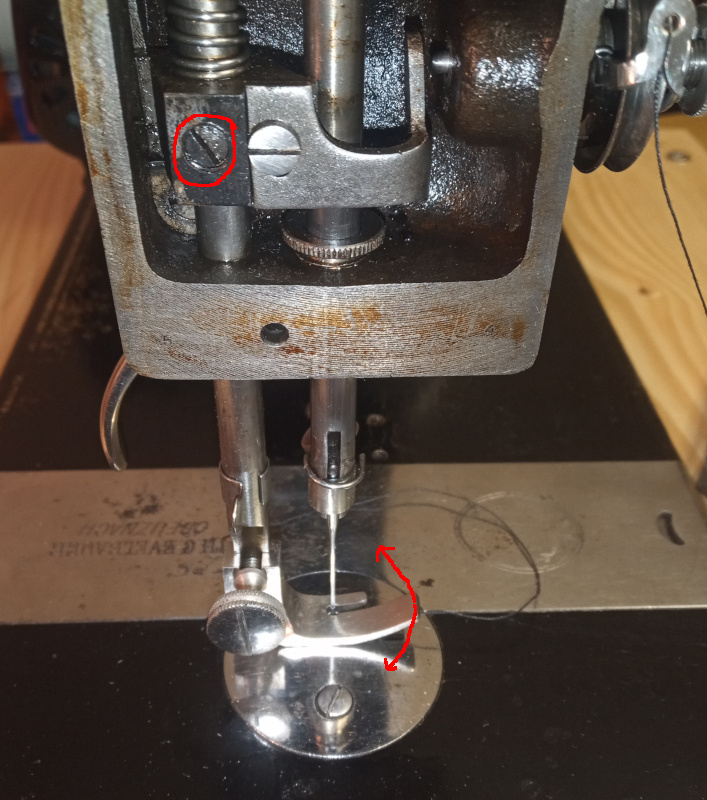 |
Tighten the screw after adjusting, then check that the foot doesn’t strike the needle bar while cranking the machine with the foot up. You may have to loosen the screw again and push the foot down so that it clears the needle bar.
If you collect presser feet from different sources, you may not be able to adjust the machine to use them all. You’d have to adjust the presser foot bar every time you change feet.
For that reason, I suggest getting a set of feet from one source so that they (should) all be made the same and you can adjust the machine to accomodate them all.
If you use presser feet made for zig-zag sewing machines, then this shouldn’t be a problem as they will have a slot rather than a small hole.
You will probably have to adjust the machine to use rolled hem presser feet, even if they are slotted for use on a zig-zag machine. The important part of a rolled hem presser foot is that the needle has to go through the very edge of the rolled hem. If the foot is a half a millimeter off to the wrong side then the needle will miss the hem entirely.
Thread tension
Long before I got my hands on a vibrating shuttle sewing machine, I had heard of their legendary ability to work with extremely low thread tension.
I got a chance to try that out with this machine, and found it to be true. This Pfaff K can sew with the thread tension set to a mere 15 grams (1/2 ounce.) I used it to sew some strips of cloth from an old T-shirt. The cloth didn’t tear and it didn’t pucker or get stuck in the feed dogs. My Adler class 8 chewed up a T-shirt something awful a few weeks ago when I had to make a sort of “shirt” for our cat to keep her from licking the stitches she got to close up a nasty cut.
You set the thread tension on the shuttle using the little screw.
| Shuttle tensioner |
|---|
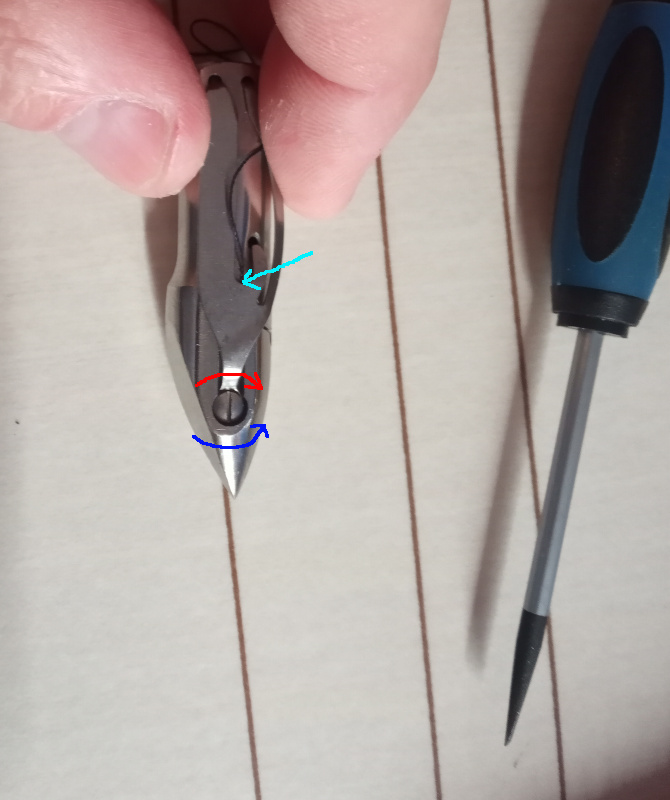 |
Turn the screw clockwise (red arrow) for more tension, turn it counter clockwise (blue arrow) for less tension.
The tension is applied at the point where the cyan (bright blue) arrow is pointing. You can just adjust the tension with the shuttle in your hand - it doesn’t have to be in the machine as when adjusting machines with a rotating shuttle.
Another thing I learned the hard way was that the spring may be bent on old shuttles. The original shuttle that came with this machine had a bent spring. It didn’t matter how you turned the screw - the tension was always too high. I flattened the bent spot out and can now adjust that shuttle from “stupidly low” to “tighter than Dick’s hatband.”
I always adjust the tension using a small postage scale. Mine is marked in grams. If you buy one in the United States it’ll probably be marked in ounces.
| Upper thread tension |
|---|
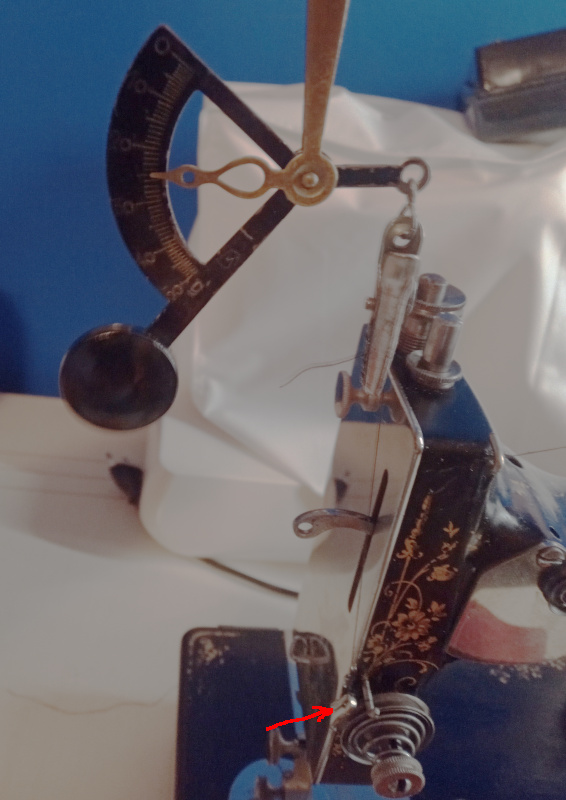 |
Thread the upper thread as shown, then clip the scale to the loose end. Pull up on the thread and adjust the tension with the upper tension nut.
You’ll want to adjust the tension using your finest thread. Wind a bobbin with it and adjust the shuttle, then thread the upper thread and adjust it. Use the scale to set the shuttle tension as well as the upper thread tension. Set them both to the same tension with the same thread.
Set the tension for that fine thread to some reasonable low value for whatever task you would use that fine thread on. If you will be sewing extremely fine cloth that puckers easily, then you can set the shuttle and the upper thread tension to 15 grams (1/2 ounce.) Yours might be able to go lower - heck, even this one might be able to but I didn’t have time for a whole lot of experiments.
I set both of the shuttles (and the upper tensioner) for this machine to 25 grams (3/4 ounce) because I’m not sure what the new owner will use it for.
Upper thread tensioner
This final “secret” will apply to nearly any sewing machine that uses the old fashioned “bee hive” tensioner. Those are the ones with the cone shaped spring and a thumb nut for an adjuster. That’s pretty much all vibrating shuttle sewing machines and a great many of the central bobbin and rotating bobbin machines out there (Singer 15, Adler class 8, and a great many more.)
| Upper tension adjuster |
|---|
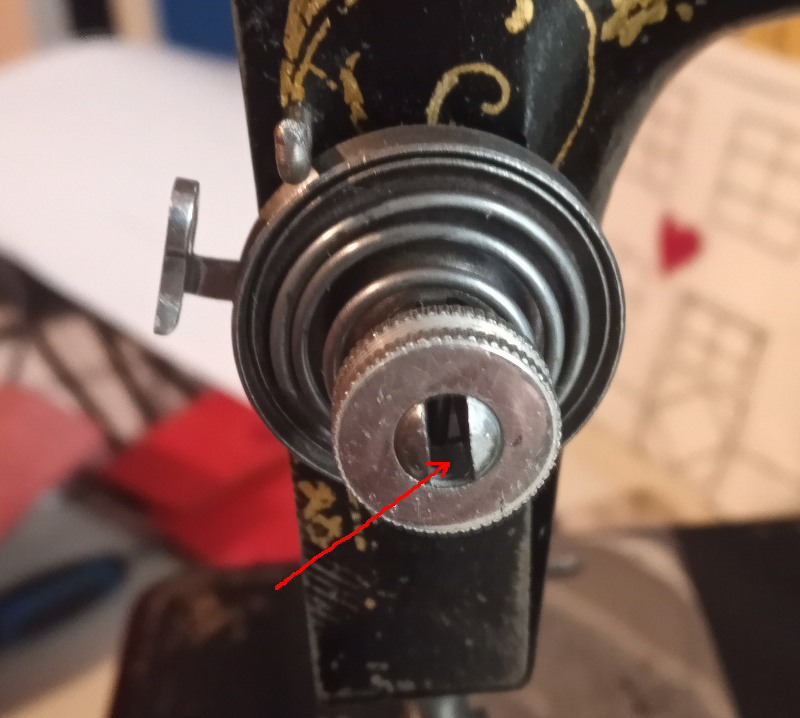 |
The axle of the upper tension adjuster is split. That’s needed so that the tension discs are held in the right position, but it also makes a difference to the tensioner nut that presses the spring.
If the upper tensioner on your vintage sewing machine won’t stay set, then take the nut off and spread the split axle just tiny bit with the tip of a flat blade screwdriver. The split axle presses against the inside of the nut and the friction keeps the nut from moving when the machine vibrates or the tension release kicks while raising and lowering the presser foot. Spreading the axle a bit increases the friction and makes it harder for the nut to turn. You want to be able to turn the nut but for it to still be tight enough not to move when things shake.
You’ll know that the axle needs spreading if you adjust the tension and everything works fine but then you start getting loops on the top side as you are sewing - and the loops just keep getting bigger as you go along.
The end
That’s all the things I remember discovering as I rejuvenated this Pfaff model K vibrating shuttle sewing machine. Maybe they’re not really secrets, but they sure were new to me.
What interesting things have you discovered about your vintage sewing machines?