The Pfaff model 31 sewing machine - Refinishing the cabinet
Really glad I did something I wasn’t planning to do.
The Pfaff model 31 sewing machine - Table of Contents
In my last post on the Pfaff 31, I mentioned that I wasn’t going to refinish the cabinet. I was just going to smooth out the dents and dings then coat the whole thing in shellac to seal in all the old “character and patina.”
As I got to looking at it, I realized that the Pfaff cabinet isn’t just a functional box to keep a sewing machine in. I found that it is a well made piece of attractive furniture in its own right. Leaving it in its shabby condition just to preserve some modern fantasy of “patina” would be doing it an enormous disservice.
Since I don’t usually do this kind of thing, my results aren’t up to professional standards. In all, though, I think I did it well enough to be proud of it.
This is going to be a long post, so I’ll break it down in sections:
Well made cabinet
I went out to the garage the other day to get started, and took a really good look at the wood and the construction of the cabinet.
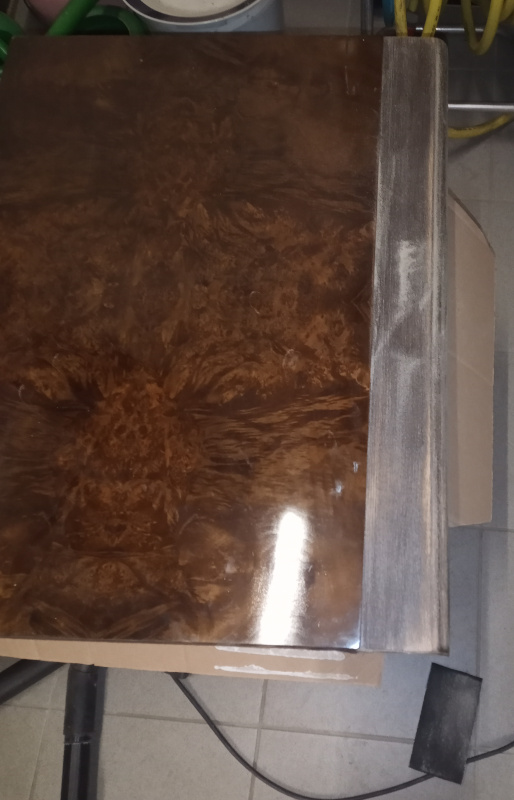
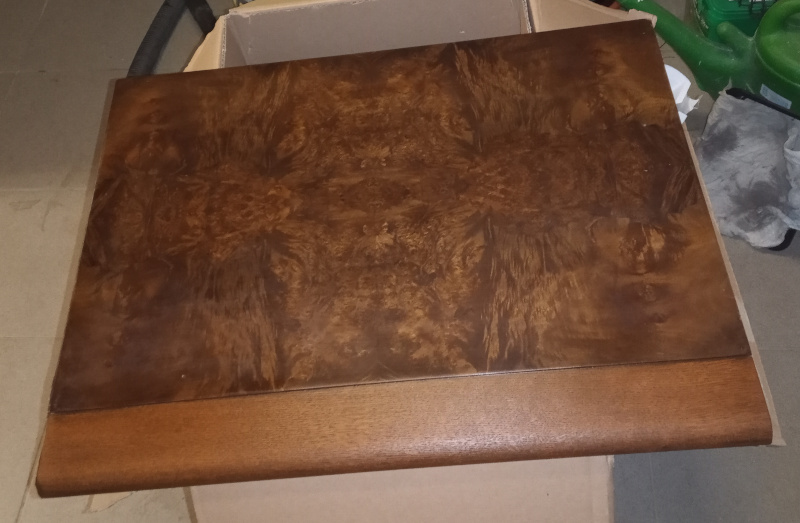
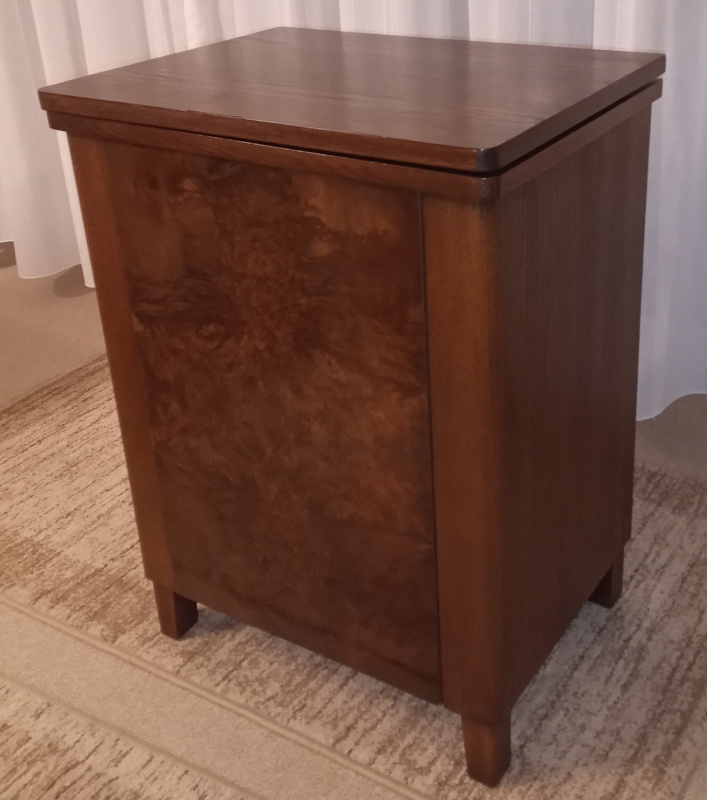
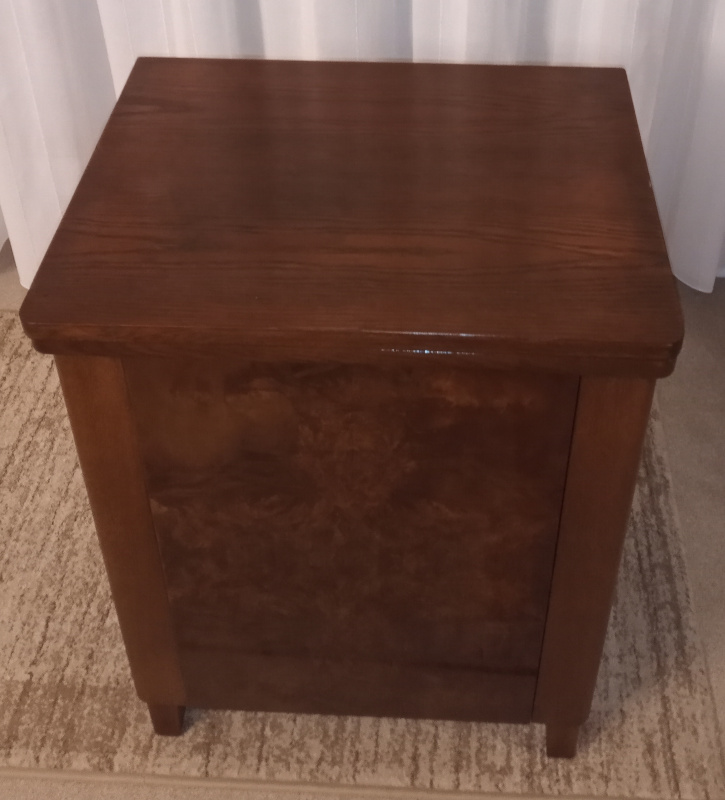
I found that the cabinet itself is made of oak, and that the front door has a veneer of walnut burl. What’s more, the veneer was made from sheets of the same piece of burl, placed so as to form a symmetric pattern. There are four slices in all, placed such that the same corner of the burl block is in the center of the cabinet front. It is symmetric vertically and horizontally.
| Walnut burl veneer pattern |
|---|
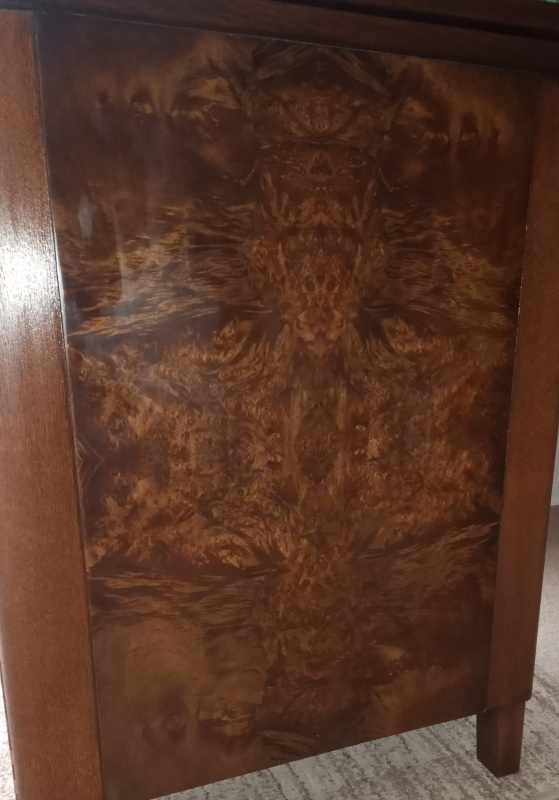 |
The pattern wasn’t as visible when I started - it helped a lot to clean off the dirt and grime.
A good look at the other panels showed them to be made of oak - all the larger pieces of the cabinet are oak veneer over solid oak. The smaller, non-load bearing, parts inside the cabinet are made of some lighter wood - and even they have an oak veneer on them.
| Oak veneer on oak |
|---|
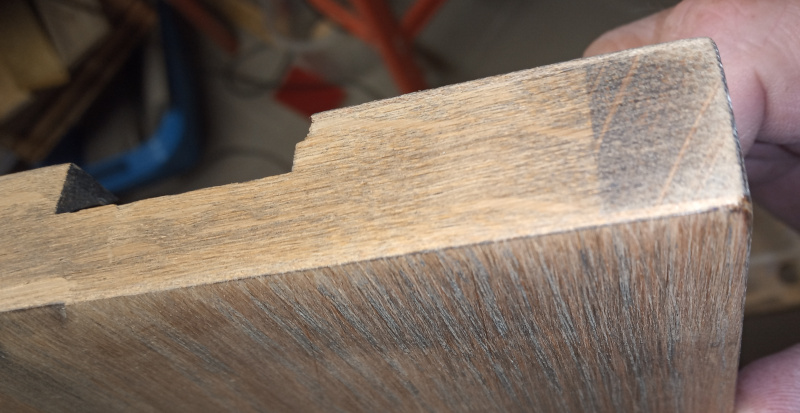 |
The panels may not be oak all the way through (I didn’t take one apart to find out,) but they have at the least a frame of oak staves around whatever wood is used in the core. Panels glued up of smaller parts (so that the grain runs in different directions) are less likely to warp or split than panels made of a single piece of wood.
The veneer over the glued up core gives the whole thing a more cohesive look than even using a single piece of wood. A single piece of wood cut into a panel would show differences between the heartwood and the sapwood. The veneer is made by “peeling” a sheet off of a log with a machine much like a lathe. A sheet of veneer has a consistent appearance with a repeating pattern.
I found (and lost) a copy of an old Pfaff sewing machine cabinet catalog somewhere on the internet. I don’t even remember how I found it. While I had it, though, I found that the cabinet for this Pfaff 31 was called the “Nussbaum” cabinet. Literally “nut tree,” it is usually translated (in the sense of carpentry) to “walnut.” The cabinet has a front panel of walnut burl veneer, and the other parts of the exterior are walnut stained oak.
Now knowing just how well made the cabinet was, there was no way I could just “seal in the shabby” and call it done. I had to give it my best shot at refinishing it to its full beauty.
Tools and materials
Given that everything of any importance on the cabinet is veneered, I didn’t want to chance using an electric sander on it - it would be way too easy to sand right through the veneer and destroy a panel. There’s no way I could fix a mistake like that. Hand sanding is the only way forward.
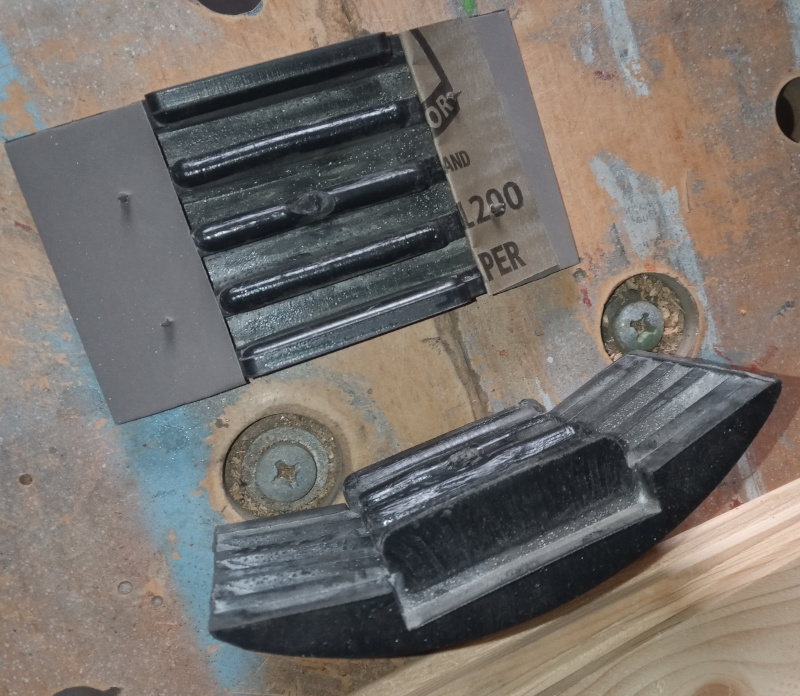
There were really only two tools involved in refinishing the cabinet:
| Tools |
|---|
 |
 |
 |
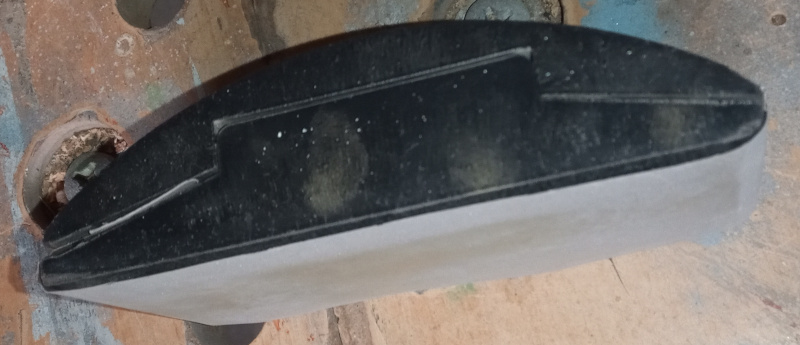
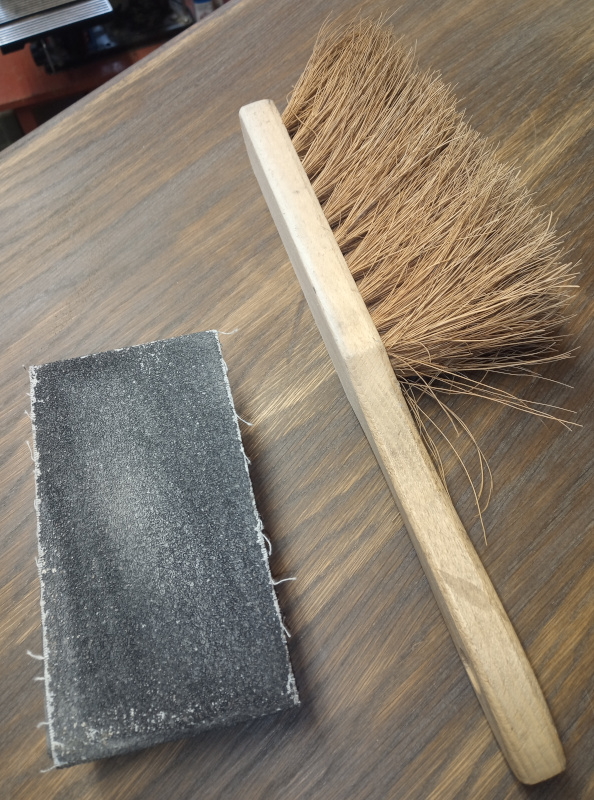
The sanding block is made of hard rubber. It holds the sandpaper in place with a couple of little nails and pressure from the cover. The hard, flat bottom makes it easy(er) to sand a flat surface flat.
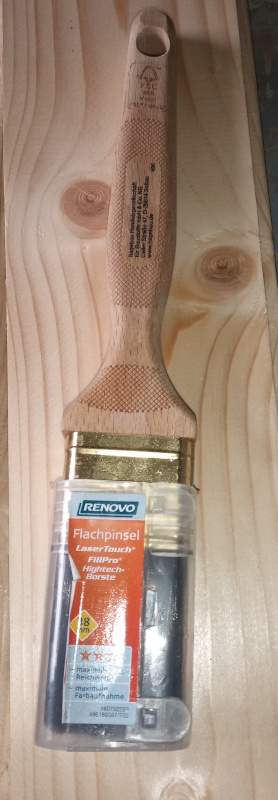
The paint brushes I use are the premium model from the local hardware store. I don’t know how really “premium” they are, but they (almost) never lose hairs. The clip-on covers on the brushes are one of the handiest things I’ve ever found for paint brushes. They clip on tightly and keep the brush from drying out. They came with the brushes - those covers alone make up for the higher price compared to the cheaper brushes. With the covers, I didn’t have to clean the brushes until I was completely done refinishing the cabinet - and that took several days spread out over the last week or so. Those covers even managed to keep shellac from drying out in the brush. If you see brushes with that kind of cover, grab ‘em. They’re worth it.
I did keep a hand brush handy at all times to brush off the surface as I was sanding things. Too much dust tends to clog up the sandpaper.
There were more materials involved than there were tools.
| Materials |
|---|
 |
 |
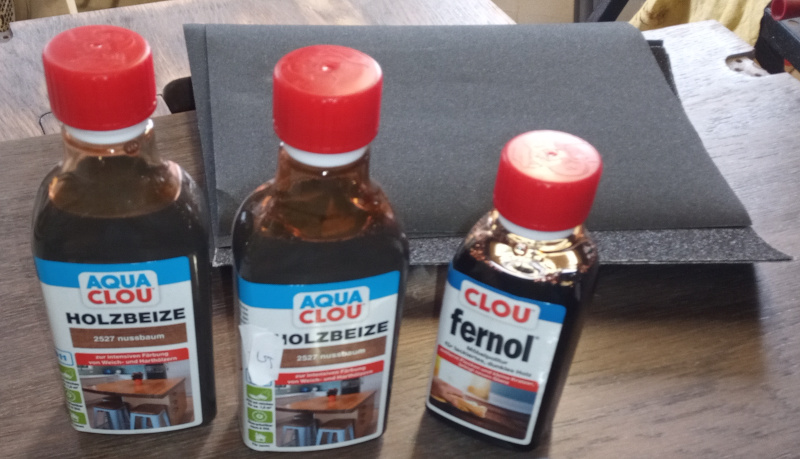
I bought two bottles of walnut stain (“Holzbeize Nussbaum.”) I used most of one. I guess I’ll have to find another project to use up the second bottle.
I bought the refinishing oil (“Fernol”) to take care of the walnut veneer. That was one of my better ideas. It cleaned off the gunk and grunge perfectly, and made the grain really shine.
The sandpaper is some wet/dry corundum stuff intended for paint and metal work. I bought a couple of sheets of 40 grit, some 180 and some 320. I had 600 grit already here. I also used a piece of 1200 grit to clean up drips.
The shellac is some stuff I bought premixed to use on my Adler 8 sewing machine. It is a relatively thin “cut” of blonde shellac. It gives wood a really spectacular “fire” - it makes the grain stand out beautifully.
I use ethanol to thin the shellac and to clean my brushes. As thin as the shellac is, I find it sometimes dries too fast and too thick for me to get an even coat. That ethanol is sold as barbecue starting fluid and for use in fake fireplaces. It is cheap - a couple of bucks a liter (quart.) It is also nearly 100% pure ethanol.
You do have to be careful not to thin the shellac too much. I got a couple of coats that were really dull and flat because I had thinned it too much. A little less alcohol, a little more shellac, and the next coats had the desired “fire.”
Refinishing
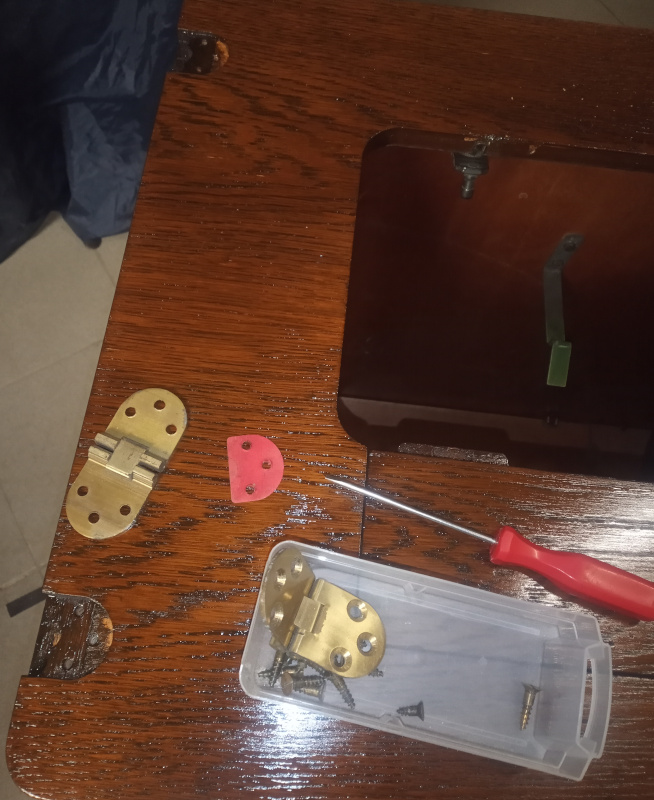
I removed the door panel and the flip panel before refinishing. It is easier to work on things laying on a workbench than flopping around on the hinges.
Remove the lid before removing the door. The lid sits on the door when you open the lid out. It helps to have the door supporting the lid while you unscrew the lid hinges.
| Removing the door |
|---|
 |
Start at the bottom and work your way up. That way, the door can hang down against the cabinet. If you start at the top, the door will try to fall to the side - you’ll have a hard time holding it up while undoing the last screws.
I used the sanding block to remove the old finish and the stain from the outside of the cabinet. I left the veneer on the front alone - I did not sand the walnut veneer at all. It is too thin for me to risk damaging it.
I started with the 40 grit paper to remove the finish, then moved up to the 180 to remove a bit of the veneer to get rid of the existing walnut stain. There’s no way to remove the finish and not remove some of the stain, so I went ahead and removed enough wood to get below the existing stain.
| Sanding off the finish |
|---|
 |
 |
I kept a brush handy to remove the dust from sanding. I also took the words of Bob Ross to heart - you’ve got to stop now and again and beat the devil out of it. In this case, I use the back of the brush to smack the sanding block to remove the dust and grunge that would other wise clog it.
Clogging is bad because it prevents it the sandpaper from removing more finish or wood. It is also bad because bits of the removed finish can melt and ball up into lumps on the sandpaper. Those lumps can gouge the wood. Don’t let the grunge build up - brush it off the wood then beat the devil out of your sandpaper.
You have to be careful to sand things down evenly. The surface of the wood is never perfectly flat. You have to remove enough from the surface with the old stain to get an even color. The pictures above show stripes - that’s not even enough to restain. If I’d have stained that surface, the finished color would have stripes.
Oak has stripes in it, of course. You have to try to get the light parts of the wood the same color and the dark parts the same color. Approximately, of course - there’s no such thing as perfect. You could argue that I didn’t get all of the surfaces of the cabinet even, and you’d be right. I’ve definitely got some patches that are lighter than they ought to be. There’s a few spots where I had to sand off a drip or a smeared spot in the shellac and went too deep - I’d have had to sand down an entire panel again to fix that. I’m not that much of a perfectionist, though, so there’s light spots here and there.
| Evening up the old stain color |
|---|
 |
The left side and top edge in that picture are pretty much evenly matched, color wise. The lower right corner is still too dark. I evened that out before staining it.
There’s a few small spots where I filled some holes along the top there. There was a piece of veneer that peeled out in a straight line along the grain, and there were a couple of holes where something punched through the veneer down to the wood below. Since that’s the area the cloth has to slide over while sewing, I filled them rather than just sanding them smooth like I did other dents and dings.
The filled spots are almost invisible now that everything is stained and finished. That surprised me because I used some pine colored filler that I had at hand rather than buying oak filler.
| Invisible patches |
|---|
 |
The filled spots are to the left between the opening for the sewing machine and the edge of the table - invisible at any normal distance.
| Sanding the door trim |
|---|
 |
Sanding the trim on the door was slightly scary. I had to use the 40 grit paper to get rid of the old finish, but it was right next to the walnut veneer. I kept worrying that I’d slip and ruin the walnut. I managed it, though. It probably helped that the walnut veneer is on a raised panel above the oak - there was a step a couple of millimeters high to keep me from accidentally hitting the walnut.
| Stained door trim |
|---|
 |
As I said, I managed to sand the trim without damaging the walnut panel. Here I’ve applied the walnut stain to the oak. It hasn’t been shellaced yet.
I didn’t take photos while applying the shellac. I’m not good at it. Doing it half way decently takes so much concentration that I forget to pull out the phone and make pictures.
There’s a few things to watch out for while reassembling the cabinet.
First, a trick I learned a long time ago that helps anytime you are reinstalling self tapping screws, be they in metal or in wood.
| Reinstalling the door |
|---|
 |
First off, when reinstalling the door you work from top to bottom - the reverse of how you remove it. Same reason: The top screw lets the door hang in the proper place while you work on the lower screws - you don’t have to try to hold up the door while driving a screw.
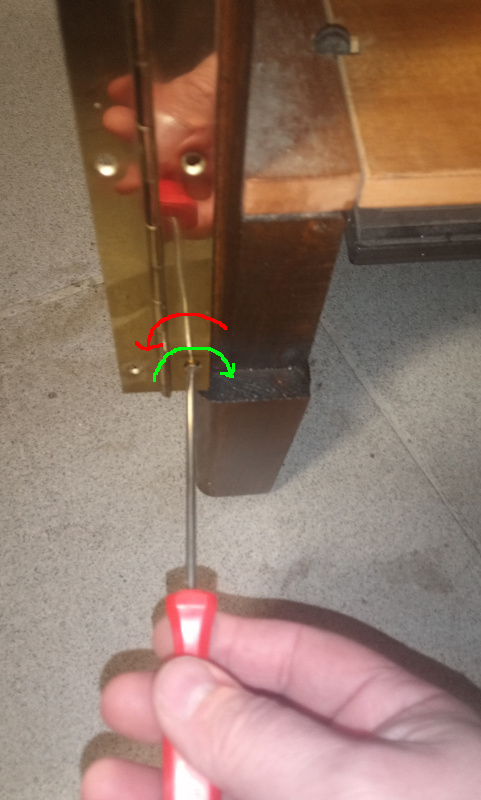
Now the trick:
When reinstalling a self tapping screw, put the screw in the hole and turn it backwards (the red arrow) like you are loosening it. Push it in with just a little pressure, and turn it backwards until you feel or hear a small “click.” When the screw clicks, the screw threads and the threads in the wood are aligned. Stop when it clicks, then tighten the screw (green arrow.) It’ll go into the old threads without cutting new ones. That keeps you from stripping the threads out of the hole. Nothing sucks like a stripped screw hole in old wood.
If you’re not sure what the click is like, turn a screw backwards all the way around. Somewhere in there you’ll feel or hear the click.
Next is what to watch out for when removing and reinstalling the lid of a sewing machine cabinet.
| Cabinet lid shims |
|---|
 |
The half round red thing is a shim. They were installed to make the lid sit level with the top of the cabinet when the lid is open. Make pictures or take notes of where they are when you remove the lid and put them back in where they came from when you put it back together.
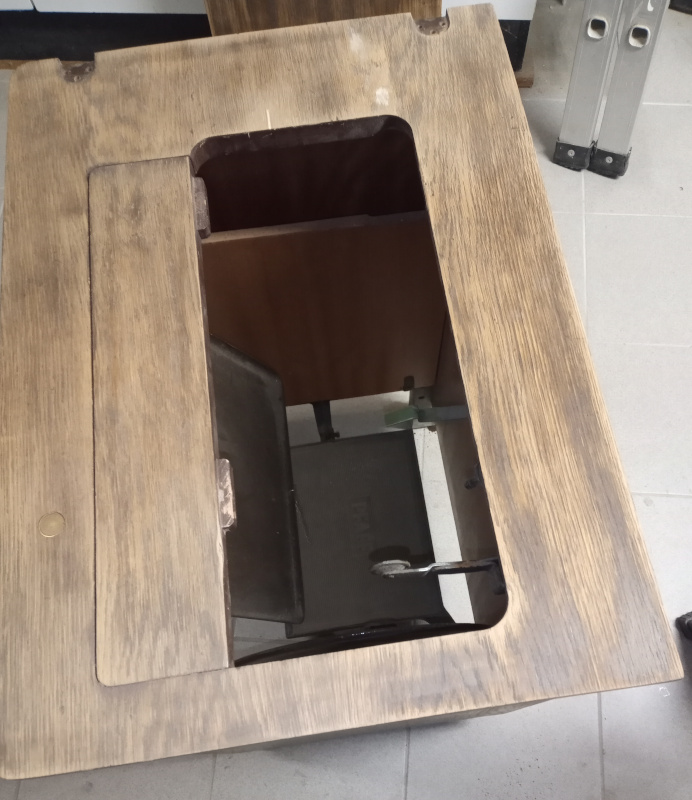
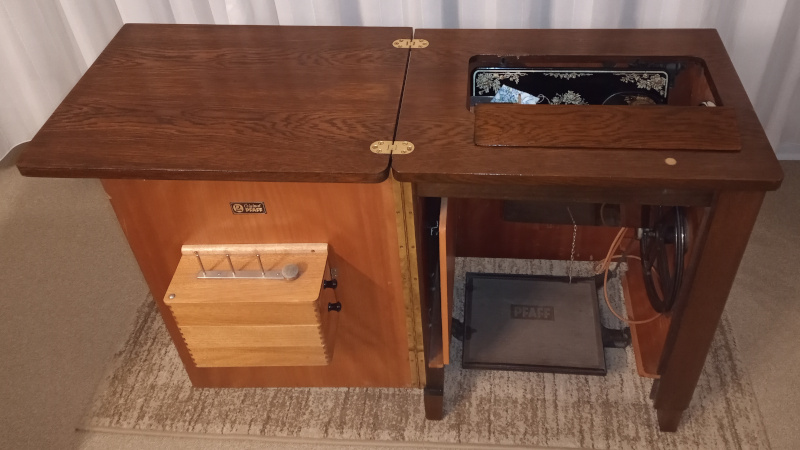
Putting the machine back in is pretty easy. There are two hinges in the cabinet. Each hinge has a pointed rod that sticks into a hole on the underside of the machine. Raise the hinges to point up, slide the rods into the holes, then lower the machine into its normal working position.
You have to tighten the screws from below. Put the machine down in its working position, then slide it around a little until it is centered in the opening. Lay down on the floor on your back, reach up inside the cabinet, and tighten the screws.
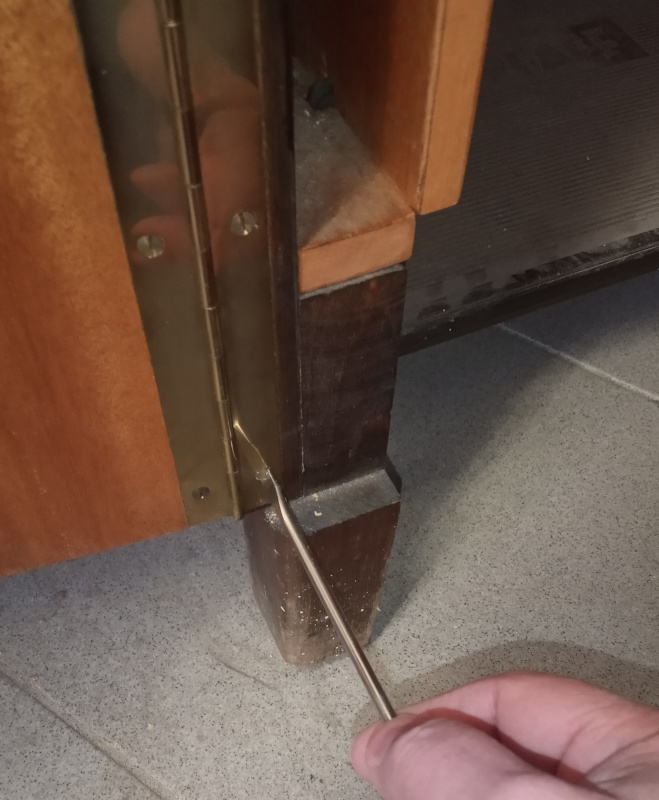
| Hinge screw and machine lift |
|---|
 |
The screw marked in green is the one that holds the machine in the cabinet. There’s one for each hinge - tighten them both.
The thing marked in red is the machine lift. When you raise the lid, the spring loaded lift pushes the machine up to where you can raise it into working position. That big spring also makes it easier to lower the machine without mashing a finger.
I don’t know how to adjust it. I couldn’t figure it out. It’s just as well. The lift in mine is properly adjusted. When you raise the lid, the machine pops up a centimeter or so. When you close the lid, the lift drops back down so everything is closed up properly. I saw the machine sticking up by that little bit, and thought I needed to adjust the lift. Then I closed the lid and realized that it was working properly.
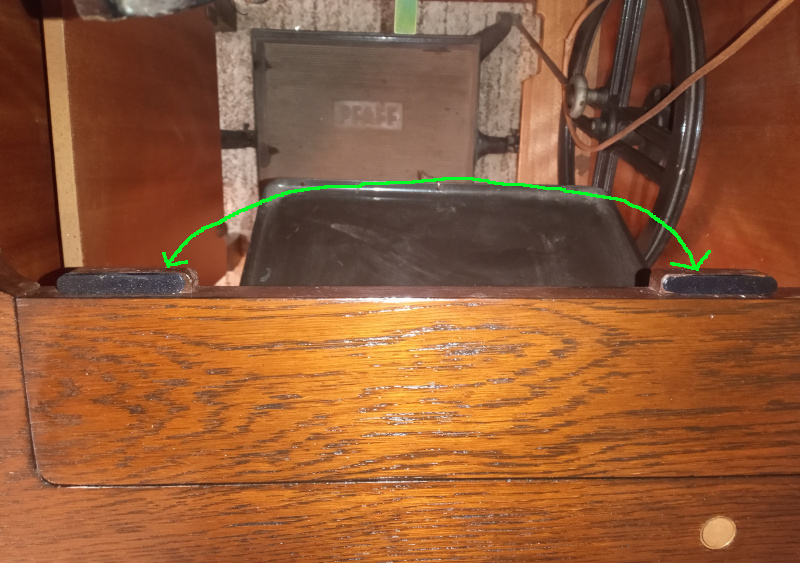
One final little thing, then I’ll show you what the whole shebang looks like.
There were two little rubber pads that support the front edge of the machine. The machine sits on two little supports along the front edge. The rubber pads raised the front edge of the machine to be even with the top surface of the cabinet. One of those rubber pads disintegrated. It turned into some crumbly green junk. I replaced both of them with some 2.5mm thick leather pads.
| Leather pads |
|---|
 |
Results
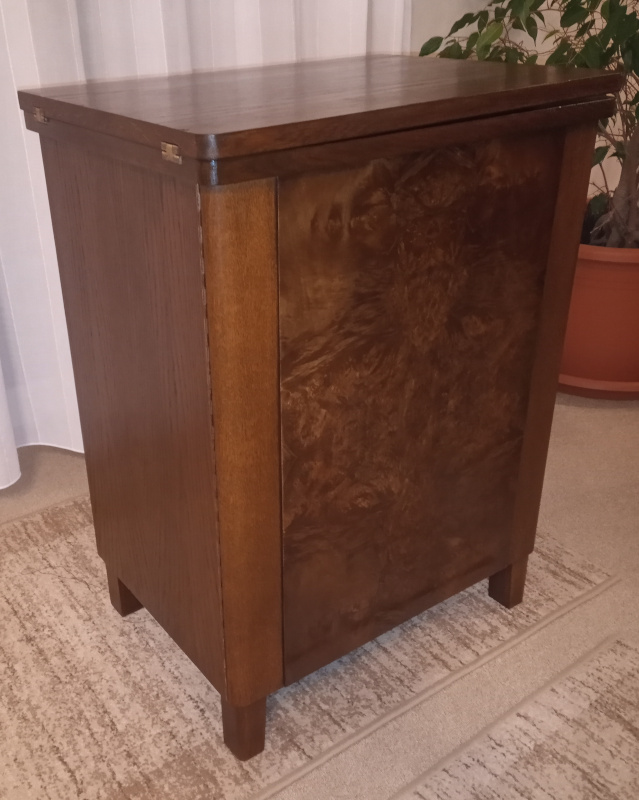
At this point, there’s not much to tell. I’ll just show you the pictures.
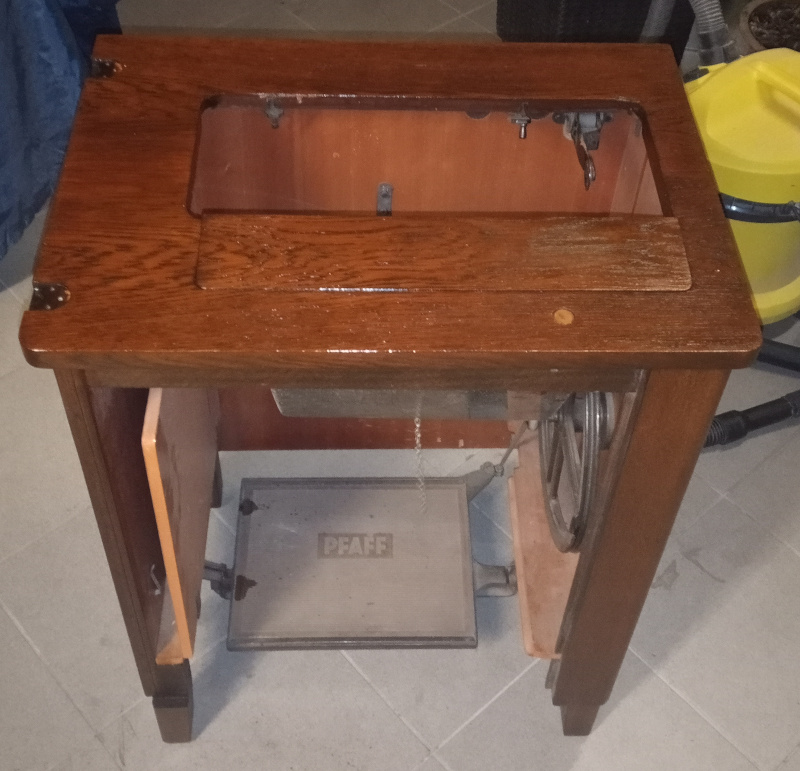
| Pfaff model 31 in its walnut (Nussbaum) cabinet |
|---|
 |
 |
 |
 |
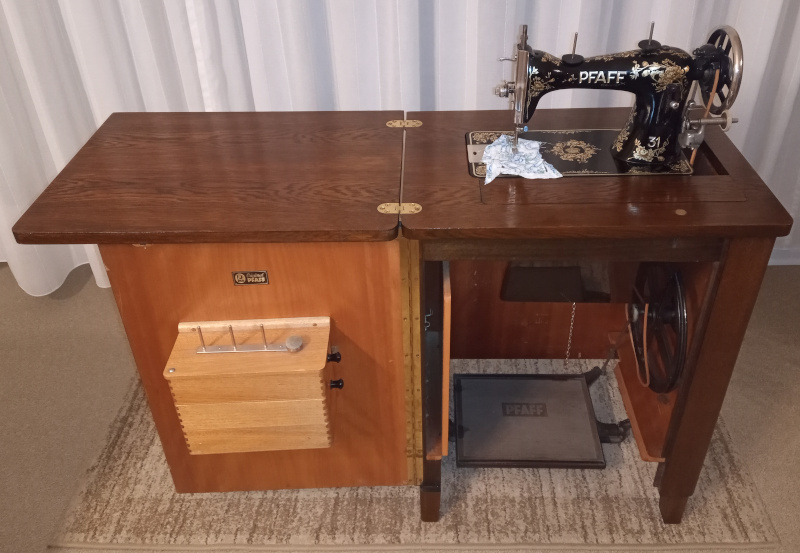 |
You can see that I didn’t get the color perfectly even all over. I still think its pretty darn good looking. I may not have gotten it perfect but I’d have kicked myself if I hadn’t even tried to refinish it.
However good or bad I may have done the refinishing, it still looks better than it did after my daughter and I retrieved it from my father-in-law’s basement workshop.
The Pfaff model 31 sewing machine - Table of Contents
A small note before the end:
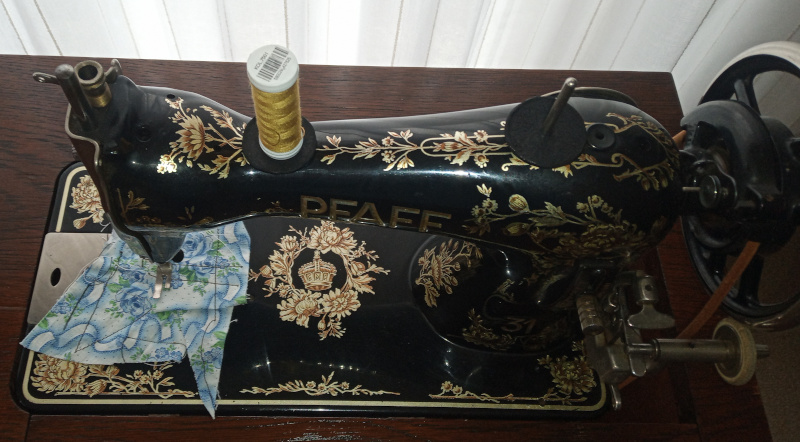
Do your vintage or antique sewing machines a favor. Put coasters under the thread spools so the finish doesn’t get worn off.
On many machines the spools just sit on the housing. They wear away the finish leaving bare metal underneath.
Make some coasters from cloth or leather and keep them on the spool pins at all times.
I made two for my Adler class 8 machine and I put two on the Pfaff 31.
| Spool pin coasters |
|---|
 |
I make them of leather, but cloth works just as well.