The Adler class 8 sewing machine - A problem with the thread tension
It’s the little things that make life difficult.
Click here to see all the Adler class 8 posts.
I promised long ago that I would explain how to adjust the tension on an Adler class 8 sewing machine, but I’m not going to do it quite yet. This post is about some problems I had while figuring out how to tame my Adler. A later post will contain some details of the tensioning mechanisms and after that I’ll put up a step by step description of how to adjust the thread tension on an Adler class 8 sewing machine.
It has taken me nearly 4 months to get back around to writing up the thread tensioning because I’ve been rather busy. Besides building the base for the Adler, I’ve also restored the cabinet of a Pfaff 31 for my daughter and done other little piddly things besides.
Along the way, I’ve gained a bit of experience with regards to sewing machine thread tension and how to adjust it. One of the things that finally sank in is that the tension on the upper thread and the tension on the lower thread are usually very close to equal. I verified that on the Pfaff 31 I mentioned above, on a Pfaff 262, and on an AEG 376. On all of them, they work best when the two tensions are (nearly) equal.
Only the Adler was out of step. The upper thread tension had to be far higher than the lower thread tension in order for it to sew properly. Everything I’ve read and all of my own experiments says that’s wrong.
After much experimenting and closely observing the needle, thread, and bobbin while cranking the balance wheel by hand, I found that the thread was hanging at a certain point in the rotation of the rotary hook.
It looked like the spool holder was too close to the hook, pinching the thread between the bobbin case and the spool holder. The actual cause was something else entirely, and it is something you need to keep in mind with old machines.
| Thread path around the bobbin case |
|---|
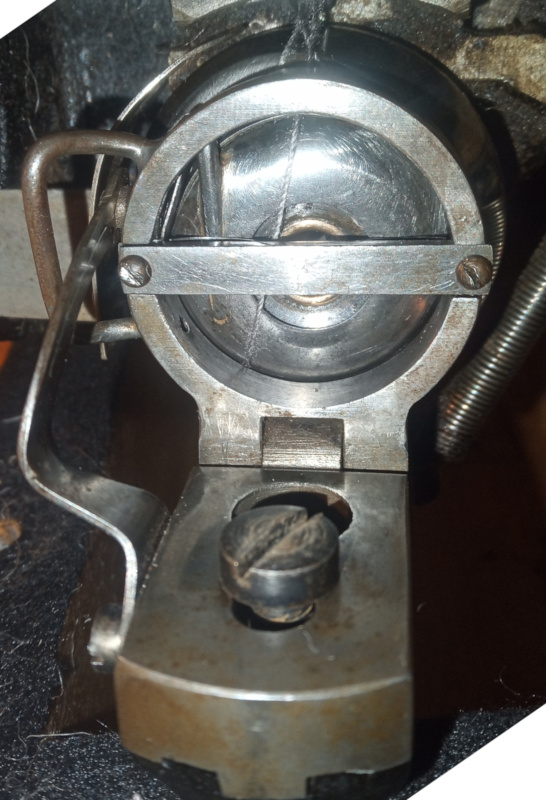 |
I found there was a small ding in the rim of the spool holder. When I found it, it looked like a scratch - no depth, just a bright line across the edge of the metal. I couldn’t even feel it with a fingertip. It wasn’t until I ran a fingernail across it that I found out how deep it was. Too shallow to see properly, too shallow to feel with a fingertip, deep enough for a fingernail - or a thread - to catch in it.
| Teeny tiny little scratch in the spool holder |
|---|
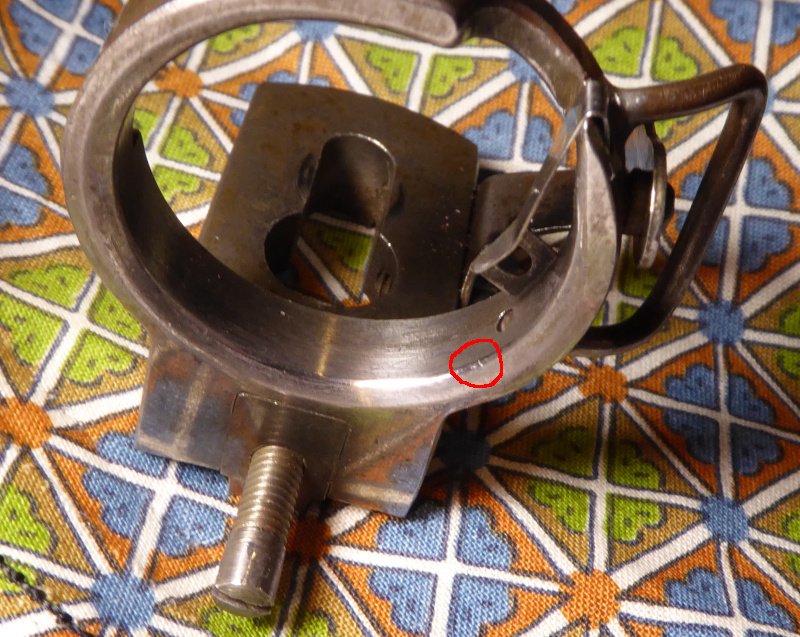 |
That little scratch (circled in red) would almost always catch the thread, requiring a really strong yank from the take up arm to get the thread to come up to lock the stitch.
This is where the usual method of adjusting the thread tension failed. When I adjusted it after cleaning up the machine, I did it the way everyone describes it - make a test seam, adjust the upper tension, repeat until the loops on the bottom side are gone.
That worked, but I ended up with such ludicrously high thread tension settings that I couldn’t measure it with my postage scale. The scratch also made it impossible to adjust the machine to sew normal fabric with anything approaching a normal thread tension with normal thread. It wasn’t until I tried to adjust the thread tension using my postage scale method that I discovered the jacked up tension. With that little scratch there, I could not get the machine to sew with normal thread - it always left great long loops of thread on the bottom of the material. Bird nests from hell.
I polished the scratch out with some 600 grit sandpaper, then polished the whole rim with jeweler’s rouge. The spool holder is slicker than a whistle and the thread no longer catches on the rim.
I can now reliably sew seams with regular thread at about 35 grams of tension on the bobbin and the upper tension.
Old machines can have little problems that you can’t see but which will make your life difficult.
Keep in mind that your fingertips often can’t feel the imperfection that is causing the problem. It’s easier to find rough spots with a fingernail than with a fingertip.
In my next post I’ll show all the parts of the Adler class 8 that are involved in tensioning the thread.
I’ve been calling the scratched part the “spool holder.” That’s what it’s called in the Jones’ Spool user’s guide. (From the International Sewing Machine Collectors’ Society collection of Jones user’s guides.)
Jones was a British sewing machine manufacturer. The Jones’ Spool was their variant on the Wheeler and Wilson 9 - the same machine my Adler 8 is derived from.
The German language Adler class 8 user’s guide refers to the spool holder as the “Brille.” A literal translation would be “rim” or “(eyeglass) frame.” Neither of those words would be especially clear, so I opted to use the phrase from the Jones’ Spool user’s guide.